顯示具有 Lathe 標籤的文章。 顯示所有文章

7/08/2008

Gib fitting

This is properly the first problem I've found in this lathe. When I wind the cross slide hand wheel, the cross slide moving with rocking. And this can be easily observe by eyes!

Then I decide to take the cross slide off and see what's wrong.
And this is...

The gib was a bit higher than the dovetail. That means, the cross slide cannot sit down properly on the saddle.
What I am going to do is file the gib down...
Now, the cross slide can sit down properly on the saddle, but when I insert the gib deeper into the space, rocking movement come back again.


When I carefully look at the gib and the dovetail, I find that, the gib is more likely to be less than 55 degree of the dovetail.
Put it deeper into the taper space will press it upward and push up the cross slide again.

Now, I've the handy epoxy putty, put a thin layer on the non-sliding surface of the gib.

Finally, the rocking motion become unseeable.
Of course, I will need to check the cross slide by level or DTI when higher accuracy is needed.

7/07/2008

Lead screw end support bearing

After I've taken out the lead screw, I found that, the end which close to the headstock was directly inserted into a tube.

Without any bushing or bearing support, I can see there has a scrap mark on the inner surface of the tube. And it was definitely a thread scrapped mark!


Luckily, I find a 12x8mm bearing on hand, and...
Turn the lead screw end down to 8mm and bore up the tube to 12mm...

And that's it, you can use what ever spec. of bearing , as long as it is not larger than the tube (0.625 inch), cheap and easy to find for you.

5/11/2008

Run out of 3-jaws chuck

Normally, no one will re-chuck the work piece to turn both ends, unless it is absolutely necessary. Especially re-chucking the 3-jaws self centering chuck will make you get into trouble.

But, checking the run out is another thing; it can be performing very easily.
I am going to use an edge finder to check the run out. Some people will use a drill rod, or the clamping end of the drill bit. All of them are work, as long as the testing rods are straight and concentric.


Because the chuck was sitting on the spindle shoulder, if you didn’t check the flatness of the shoulder, you can put the probe closer to the chuck to eliminate the whirling effect.

If the testing rod has marking on it, it’s better to avoid clamping and touching on the marking.

I was surprised that my chuck has 48 microns run out. It was a bit large. What I can do now is dissemble and clean it; to see if I can make it better or not.
3-jaws self centering chuck was dissembled and cleaned

Re- grease the chuck
Assemble the chuck
Finally, I’ve got 13 microns run out; it’s a much reasonable result!
Run out of 3-jaws self centering chuck can be varying to different chucking diameters duel to the structure of the chuck.

My suggestion is after you’ve confirmed the center of spindle was parallel to the X rail; you can turn a shock down to the common working diameter of your projects, cut off it from the chuck, and you will have your own run out testing rod.

Lathe Spindle

I am going to check and adjust my lathe first, and then the mill will be followed.
First thing I am going to check is the spindle. There are two critical matching surfaces.


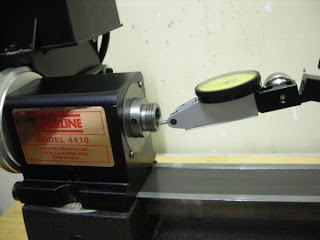
1. The shoulder; inclination and flatness check. I have 10 microns deviation, it can form 0.086mm radius turning error at the middle of x-axis (8.66”)


2. The concentricity of the taper hole. Luckily, my indicator doesn’t move! This taper was made in very good quality!


For the first problem, I‘ve used miniature file and no.800 water sandpaper and try to flatten the shoulder. Finally, I‘ve made the deviation down to 2 microns with 45 minutes hand work. The error becomes -0.017mm radius at the middle of x-axis. Of course, if you have patient, you can make it much closer to zero.